
X table legs, X bracing, or other X style farmhouse furniture is extremely popular. As a woodworker and builder, figuring out the cut angles can be a challenge. But it doesn’t have to be.
What angle do you cut X legs?
Calculate the cut angles using the calculator below OR follow the ‘manual’ method below, by setting your material in the desired orientation, marking a few lines with a pencil, and adjusting your saw to the cut line.
Let’s take a look at each method:
X Angle Calculator
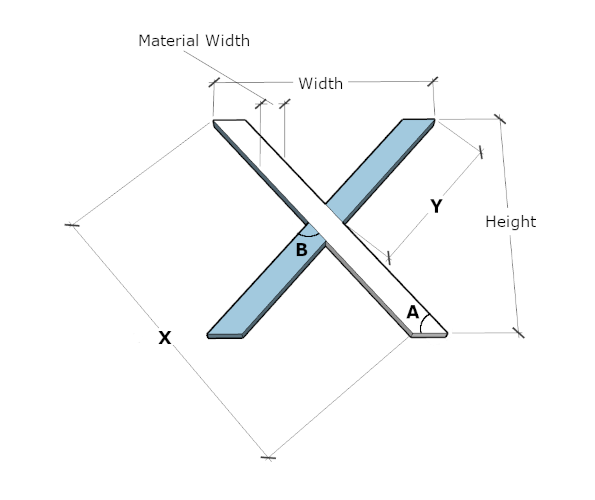
Rather than explaining the math, I’ve created a simple calculator to find the angles and lengths. Simply enter your desired height, width, and material width, and the calculator will display the X angles and lengths. Reference the image below the calculator.
After calculating the angles, you can adjust your miter saw accordingly or use one of these little $20 digital angle finder protractors (Amazon) to mark the angles on your workpiece.
Here’s the digital angle finder protractor I use on Amazon:
A few notes:
- Setting your miter saw to 0 degrees is actually cutting a 90 degree angle on the material. Once you’ve calculated your angle(s), you can determine the miter saw setting by subtracting the angle from 90. For example, if the angle on the piece of wood is 55 degrees, then your miter saw will have to be set to 35 degrees (90 – 55 = 35).
- All three calculator inputs are required (height, width, material width).
- You can use any unit of measurement (i.e. inches, ft, mm, cm, etc.) so long as ALL inputs use the same unit of measurement.
- Decimal points are allowed. Commas are not allowed.
Inputs
Results
| Description | Result |
|---|---|
| Angle A: | |
| Angle A Miter Saw Setting: | |
| Angle B: | |
| Angle B Miter Saw Setting: | |
| Length X (long piece): | |
| Length Y (short piece): |
*See corresponding image below
How To Find X Angles Without Math
Although math can be helpful when determining your cut angles, it’s not always practical. First, it assumes your materials and dimensions are perfect. Second, you’d need to memorize math equations and have a scientific calculator available. Most of the time, it’s just better to avoid math!
This second method is super simple and delivers professional results.
Step-by-step guide with pictures:
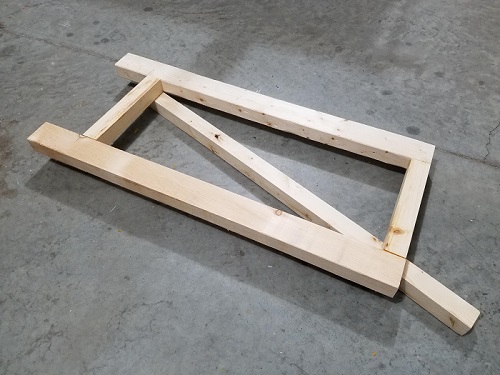
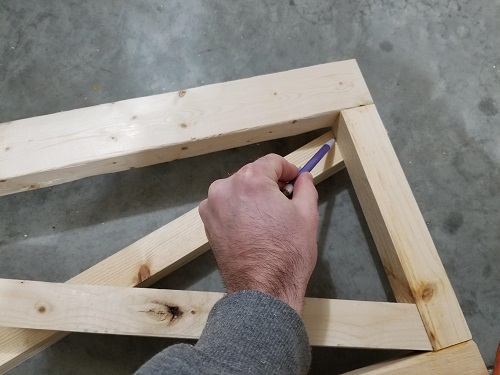
- Place one side of the X underneath the pre-constructed border and align the corners where you’d like them.
- Mark the two cut lines with a pencil (one on each end).
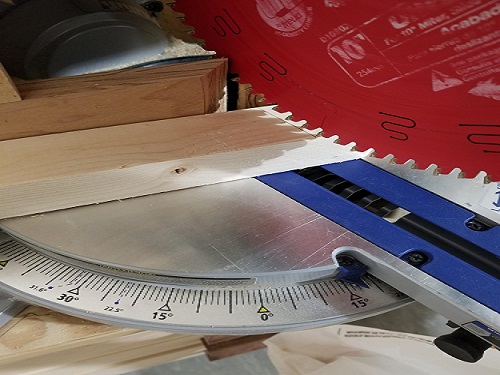
- Adjust your miter saw to the cut lines and make the cuts.
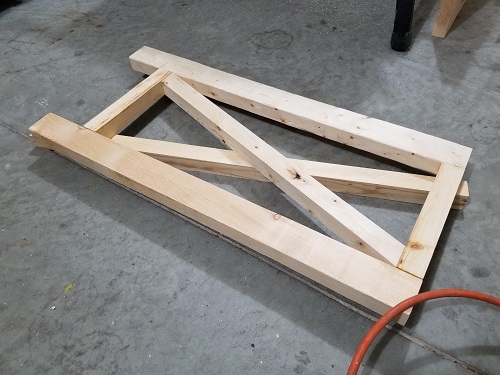
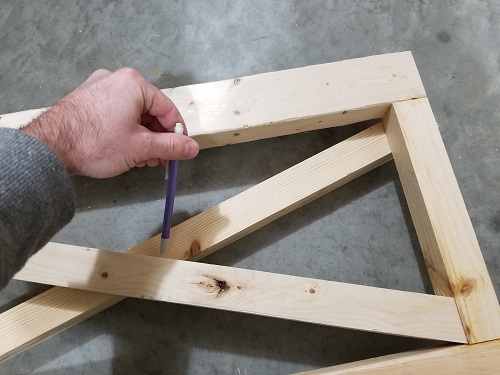
- With your first piece in place, put the second piece underneath and align the corners where you’d like them.
- Mark the four cut lines with a pencil (two outer lines and two inner lines).
- Adjust your miter saw to the cut lines and make the cuts. In a perfect world, both short pieces should be identical.

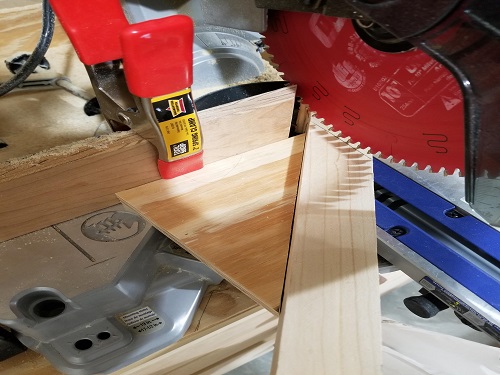
NOTE: In many scenarios, you’ll need to cut an angle greater than your miter saw can accommodate. For example, my miter saw only goes to 50 degrees. If this is the case, you can make a secondary fence/jig by using a scrap piece of wood with a 45 degree angle and use this as a secondary fence. For example, if you need to cut a 55 degree angle, use the 45 degree secondary fence and adjust your miter saw 10 degrees towards the jig. The 45 degrees on the jig plus the 10 degree miter saw setting will yield a 55 degree cut (45 + 10 = 55).
I really hope this helps you! Feel free to leave a comment below if it does!
Helpful Tools:
DEWALT Sliding Compound Miter Saw, 12-Inch (DWS779) on Amazon.com:
Thanks Cam! Your calculator worked perfectly for a set of x cedar legs for a epoxy river table I built.
Awesome!
So lucky finding this page, I’m up-cycling old decking wood from my uncles garden and making an outdoor table. Working out the angles for “ X “ legs was driving me nuts, this calculator worked a treat, thanks very much 👍
Glad it helped you!
What is the unit of measurement for the calculation?
Hey Jeff – inches for the height/width measurements and degrees for the angles.
I ENTERED MY MEASUREMENTS AND HIT SUBMIT BUT DIDN’T GET ANY ANSWERS IN THE LOWER TABLE.
Interesting – I’m sorry it didn’t work for you. I just checked and it’s working for me. It might be the phone/computer you are using. Try using a different device. I hope you get it to work.
The calculator did not work for me. It gave me NaN for angle A & angle B, Length X NaN 16″, Length Y NaN 16″. very odd
Hey – I’m sorry it didn’t work for you. Can you tell me what numbers you entered into the boxes? I can try myself and see if it works. Otherwise, I’ll troubleshoot it. Thanks!
It happened the same to me cause as an italian i am used to put , instead of . before the decimals. Try with the .
For example 25.5 instead of 25,5
Thank you for your comment. You are correct, decimal points instead of commas. Thank you for pointing that out.
I plugged in “12 inches” for the width and height and it did not calculate.
Hey – all 3 inputs are required for the calculator to work. When inputting the values – only use numbers – do not include “inches”. So, put “12” for the height, “12” for the width, and also a value for the width of your material (wood/metal/etc.). I hope this helps.
I have been looking for a guide like this for quite some time.
Would it be possible fore you to ad the choice between using inches and millimeters (metric system). I’m sure quite a lot of people would appreciate that 😁 (across the pond 😉)
Hey Morten from across the pond – you can use any unit of measurement you’d like. Just disregard the length results in parentheses.
Angles results will always be degrees.
Really – thx a lot
Hi there,
Iv just used your calculator to make some legs but it didn’t work.
My measurements were (in metric)
H: 700
W: 912
WOM: 90
Gave me angle A on mitre saw 48 and angle b on mitre saw of -6.
I set my saw to 48 degrees to the right for one cut and 6 degrees to the left for the other cut.
Iv done all this but when two pieces put together the bottom angle is way off. Do you know where I might have gone wrong?
Hi Tom, I’m sorry my post does not clarify what to do with a negative angle for “Angle B Miter Saw Setting”. I should fix that. If the result for “Angle B Miter Saw Setting” is negative, you should adjust your miter saw to the right. I tried to create an image that explains it: https://garagediaries.com/wp-content/uploads/2022/08/GarageDiaries_Comment_Image.png. I hope this helps.
Great help thank you very much for this its great all the best wishes
Barry
Can you please show the math for this?
I’ve been looking for something like this for a while, but haven’t tried
it yet, but isn’t this going to give you two different total lengths? What I mean, In the results, it’s showing (Y*2) as being equal to “X” and not accounting for the width of X.
Hey Brian – good question. When the X leg is in the vertical orientation (it’s taller than wide), the length “Y” is the measurement from the “Toe” to the “Toe” of the board. The length “X” is the measurement from the “Toe” to the “Heal” of the board. That makes the difference. Take a look at this picture that might help you visualize it: https://garagediaries.com/wp-content/uploads/2022/11/GarageDiaries_X_Leg_Length_Measurements.png
Thanks for this very helpful calculator. Where the joint is done with half laps, I assume you just double the Y length measurement measuring from toe to heel?
I would love to know the math behind de calculator… 🙏